Rocket Broadcaster stands as a pivotal tool for anyone looking to delve into the world of live radio broadcasting. This streaming encoder, designed specifically for Windows users, seamlessly takes audio from various sources — be it a microphone or a line-in device — and broadcasts it directly to your online radio station through a streaming server. The software’s intuitive design and robust features make it an ideal choice for both budding and experienced broadcasters.
With Rocket Broadcaster, you can effortlessly transform your computer into a powerful broadcast station. Whether you’re looking to share music, podcasts, or live interviews, this software ensures your audio reaches your listeners in the highest quality possible. Here’s what makes Rocket Broadcaster an indispensable tool for your broadcasting needs:
- Ease of Use: Designed with simplicity at its core, Rocket Broadcaster allows you to start your radio station with just a few clicks.
- High-Quality Streaming: Supports streaming at 128Kbps in the free version, ensuring your sound is clear and uninterrupted.
- Versatility: Capable of capturing audio directly from other applications, enhancing your broadcast with diverse content.
By choosing Rocket Broadcaster, you’re not just selecting a software; you’re equipping yourself with a reliable partner in the broadcasting world. Next, we’ll guide you through the simple steps to download and install this application, setting the stage for your radio broadcasting journey.
1/ Downloading and Installing Rocket Broadcaster
Setting up Rocket Broadcaster on your Windows computer is a straightforward process that paves the way for your digital radio endeavors. Here’s how to get started:
Visit the Official Website:
- Navigate to the Rocket Broadcaster official site and locate the download section. This ensures you are downloading the most current and secure version of the software.
Choosing Your Version:
- Rocket Broadcaster offers a free version that is perfect for beginners or those with basic needs. This one, supports one audio input at 128Kbps, ideal for clear, professional-sounding audio transmissions.
- For broadcasters looking for more advanced features, the Pro offer is available for $99. It includes enhanced functionalities like multiple sound inputs and higher quality streaming options.
Installation Process:
- Once downloaded, run the installer and follow the on-screen instructions. The setup wizard will guide you through the installation process, which typically takes just a few minutes.
- After installation, launch the program and familiarize yourself with its interface, which is designed for ease of use and efficient navigation.
Configuration for First-Time Use:
- Upon first launching Rocket Broadcaster, you might want to explore the settings menu to adjust preferences such as default sound devices and streaming quality to suit your specific needs.
By completing these steps, you will have successfully installed Rocket Broadcaster on your system, ready to start streaming your content. Next, we will delve into how to configure your sound inputs to ensure your broadcasts are crisp and enjoyable for your listeners.
2/ Configuring Your Audio Setup
Optimizing your audio inputs is essential for delivering high-quality sound to your audience. Follow these steps to ensure your sound setup is primed for superior broadcast quality:
Setting Up Audio Inputs
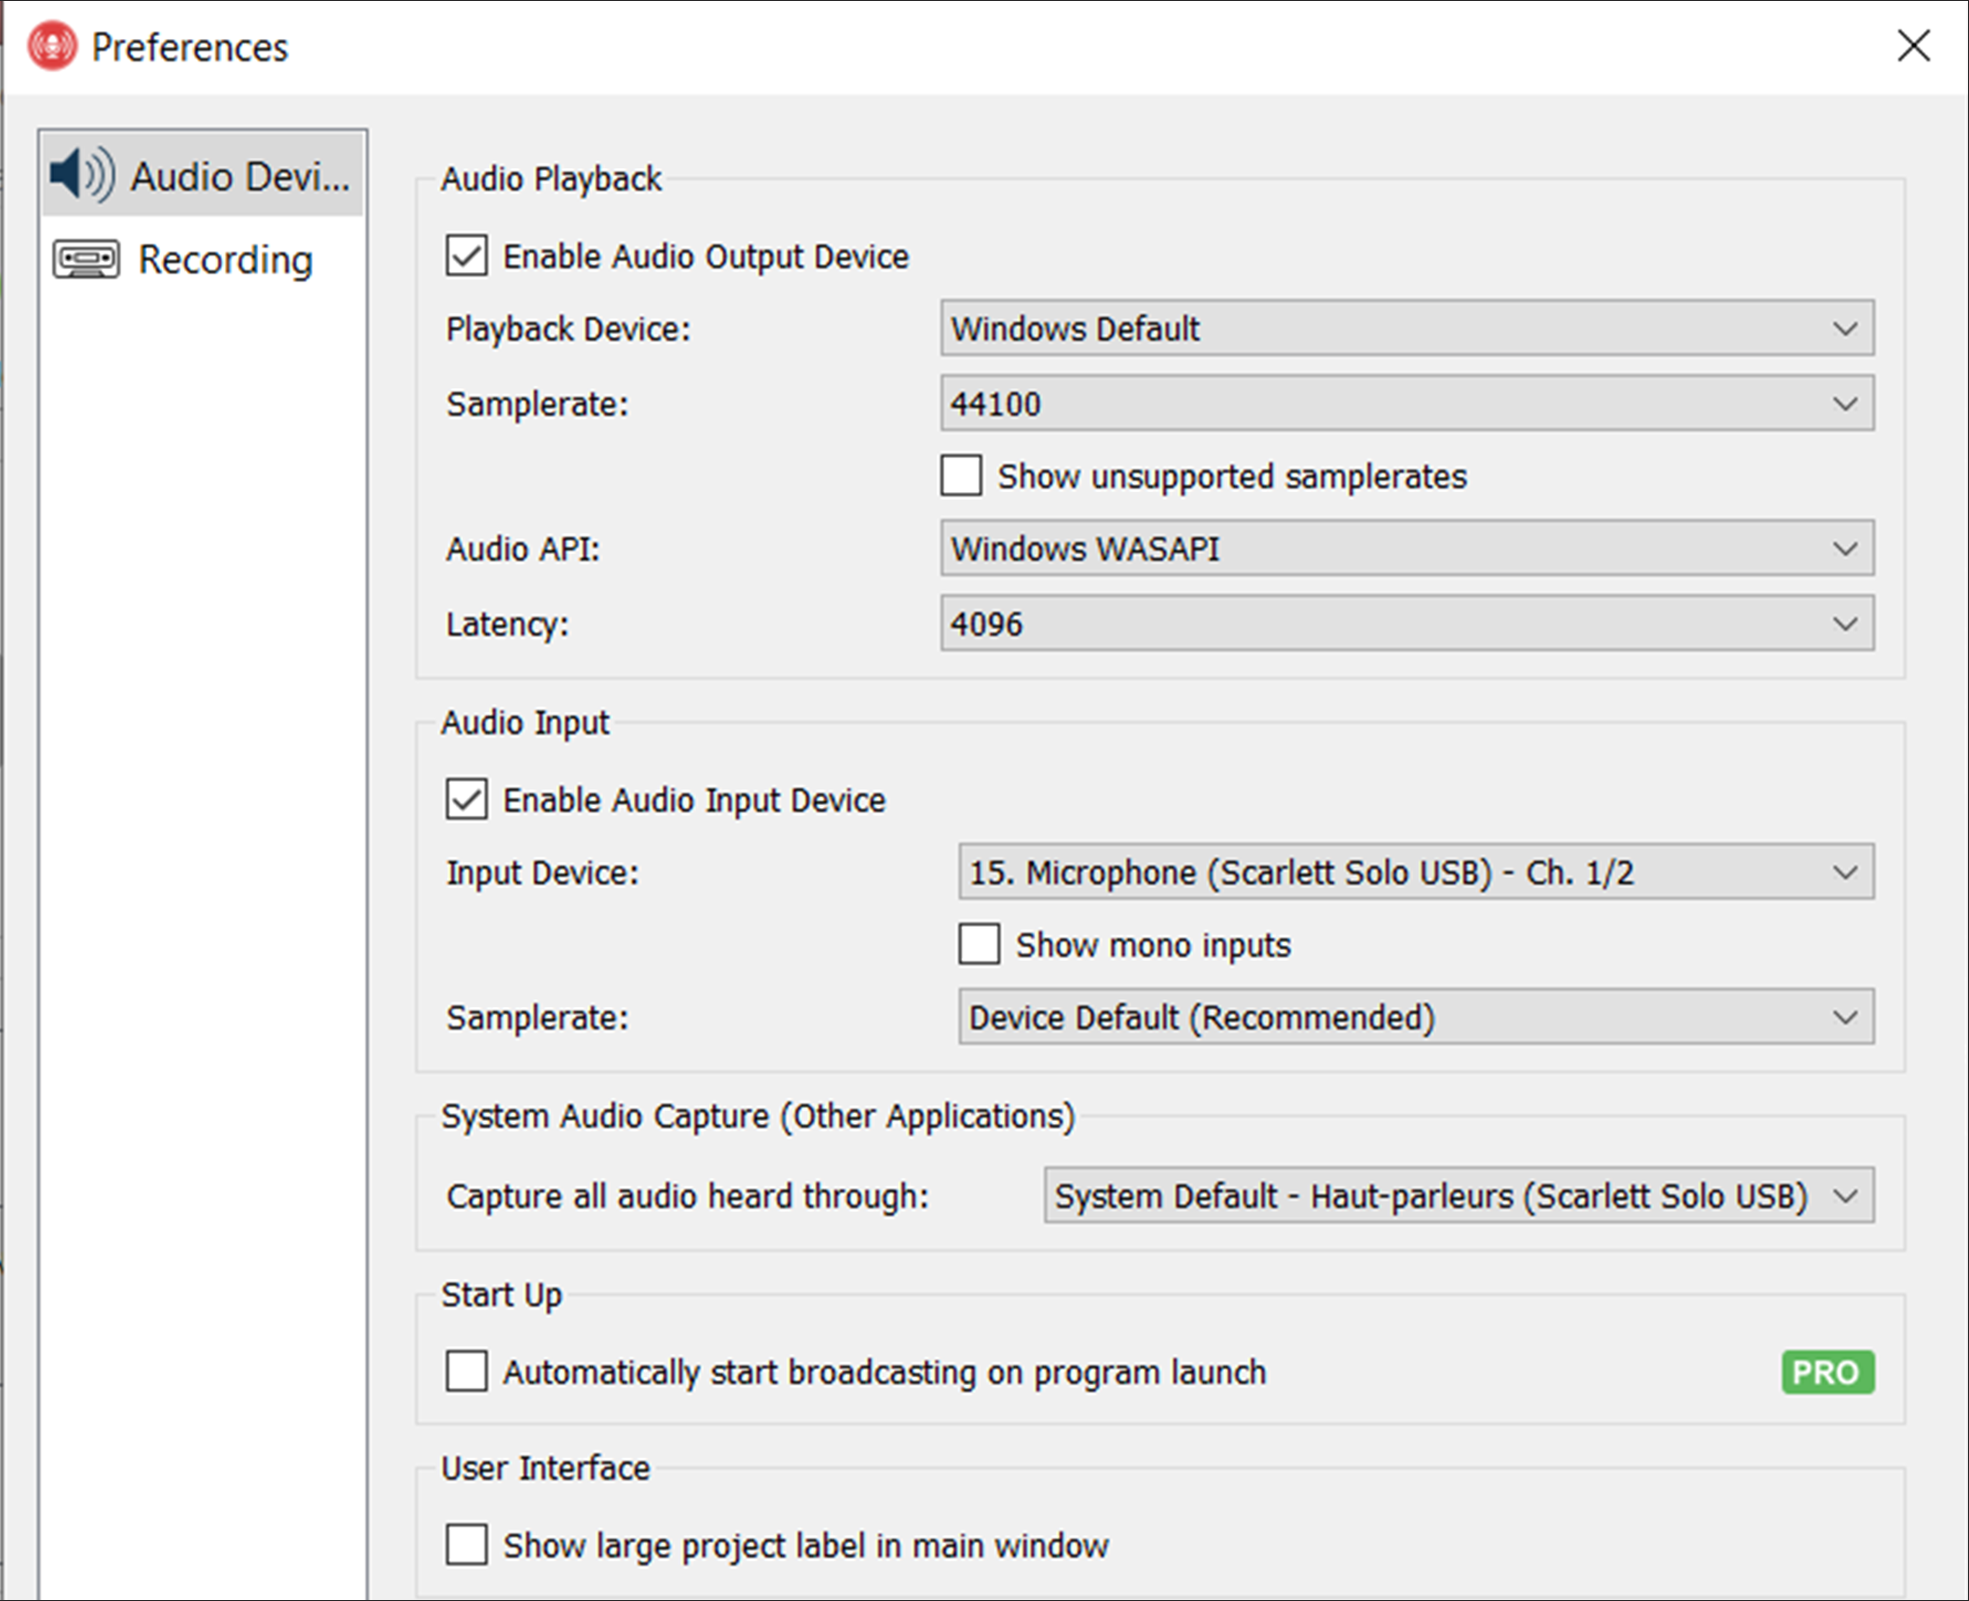
Selecting the Right Input Device:
- Open Rocket Broadcaster and navigate to the Options menu, then select Preferences.
- Under ‘Audio’, choose ‘Input Device’ and select the appropriate microphone or audio interface. This is crucial for capturing clear and undistorted sound.
Adjusting Your Sample Rate:
- Within the same Preferences window, ensure your sample rate is set to 44100 Hz. This setting is ideal for achieving CD-quality sound, which enhances the listening experience.
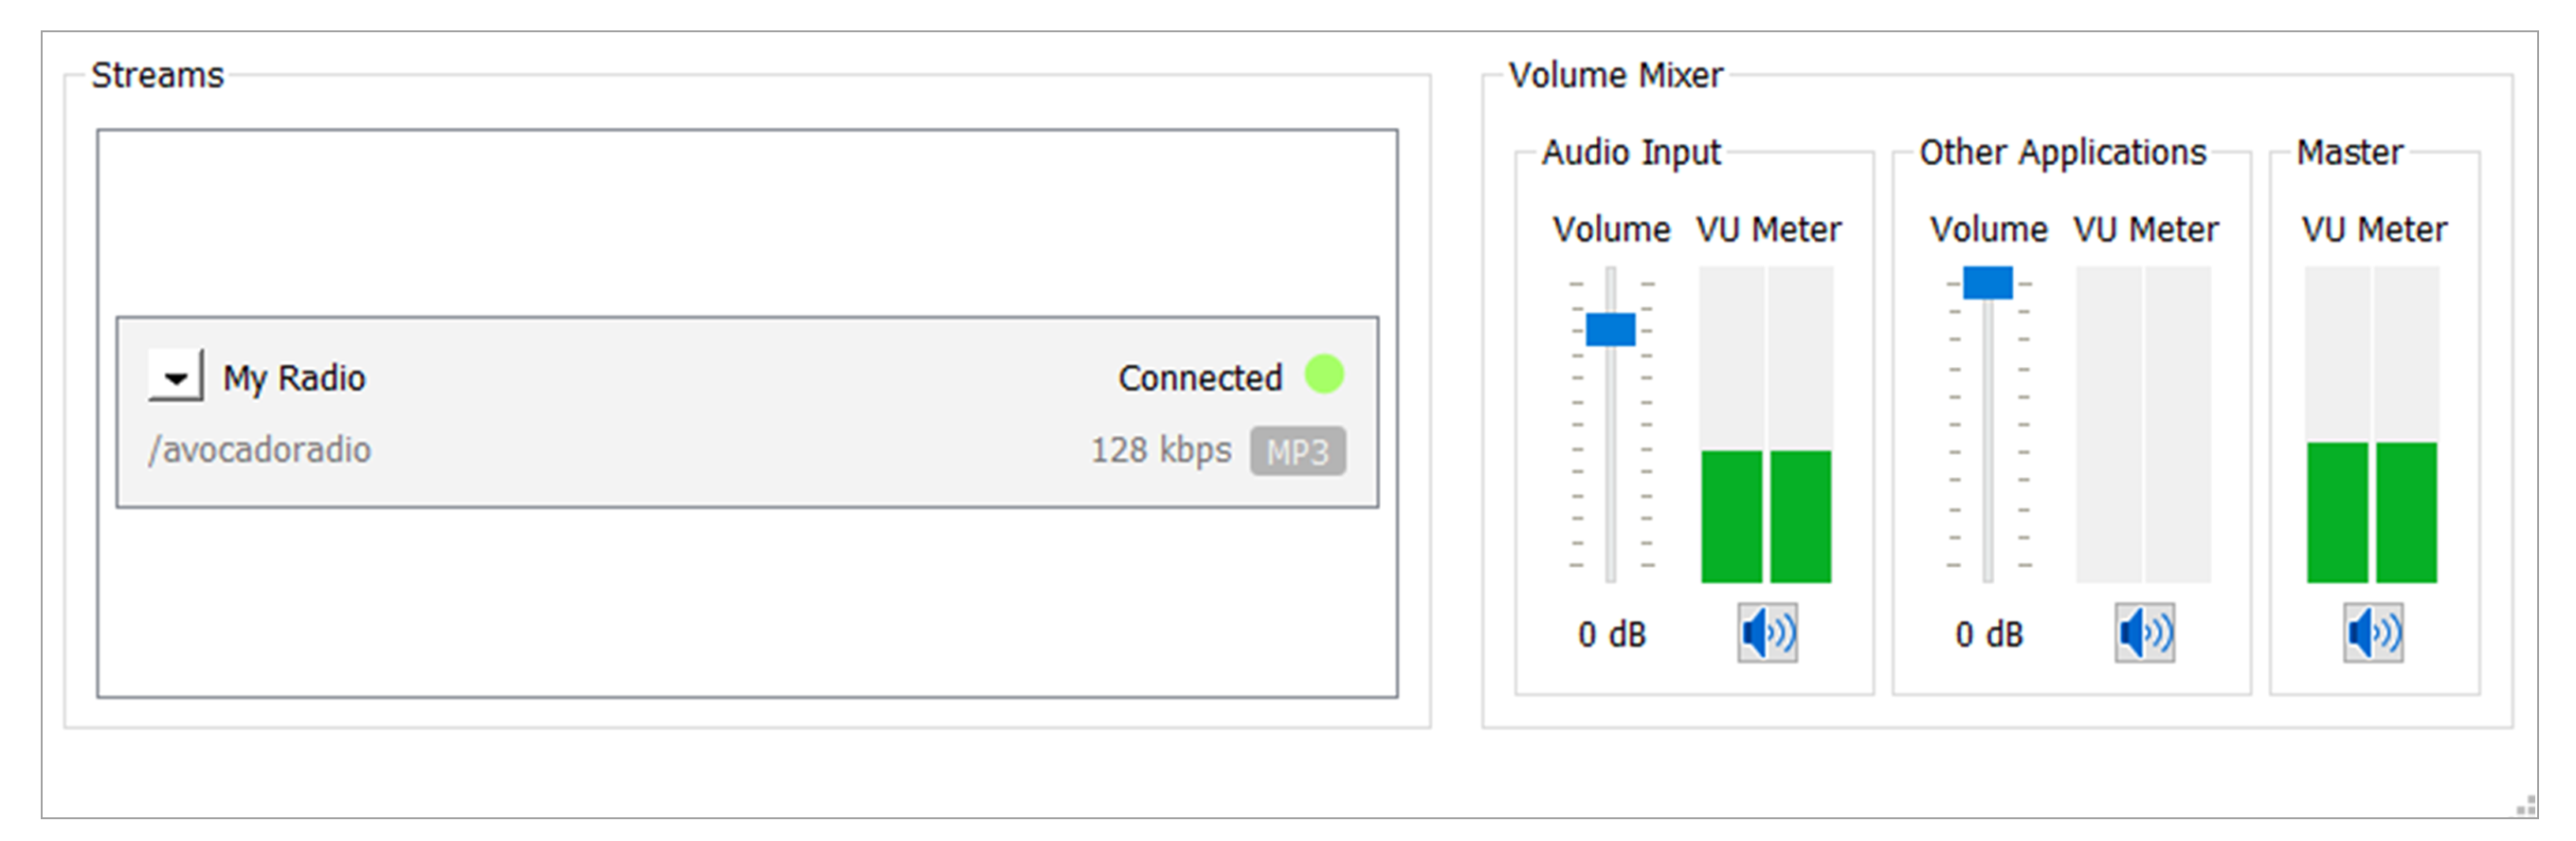
Verifying Audio Levels:
- After setting up your devices, check the sound levels in the main interface of Rocket Broadcaster. Ensure that the levels are neither too low (causing inaudibility) nor too high (leading to distortion).
System Audio Capture
Capturing sound from other applications can add variety to your broadcasts, such as playing background music or sound clips:
Enabling System Audio Capture:
- In the Preferences menu, select ‘System Audio Capture’.
- Choose ‘System Default’ to automatically catch all sounds playing on your computer. This ensures that any sound played is smoothly integrated into your live stream.
Testing and Adjusting Audio Capture:
- Play audio from the application you wish to broadcast alongside your main sound input.
- Return to Rocket Broadcaster to verify that the sound is being captured correctly and adjust the volume levels as needed to balance with your primary sound source.
By meticulously setting up and testing your audio inputs and system capture settings, you ensure that all aspects of your sound are broadcasted flawlessly. This preparation not only boosts the quality of your streams but also significantly improves the listener’s experience.
3/ Establishing Your Radio Stream
Ensuring your stream is properly configured is crucial for a smooth broadcasting experience. Here’s how to effectively set up your streaming parameters and authenticate your connection:
Server Configuration and Stream Setup
Choosing the Server Type:
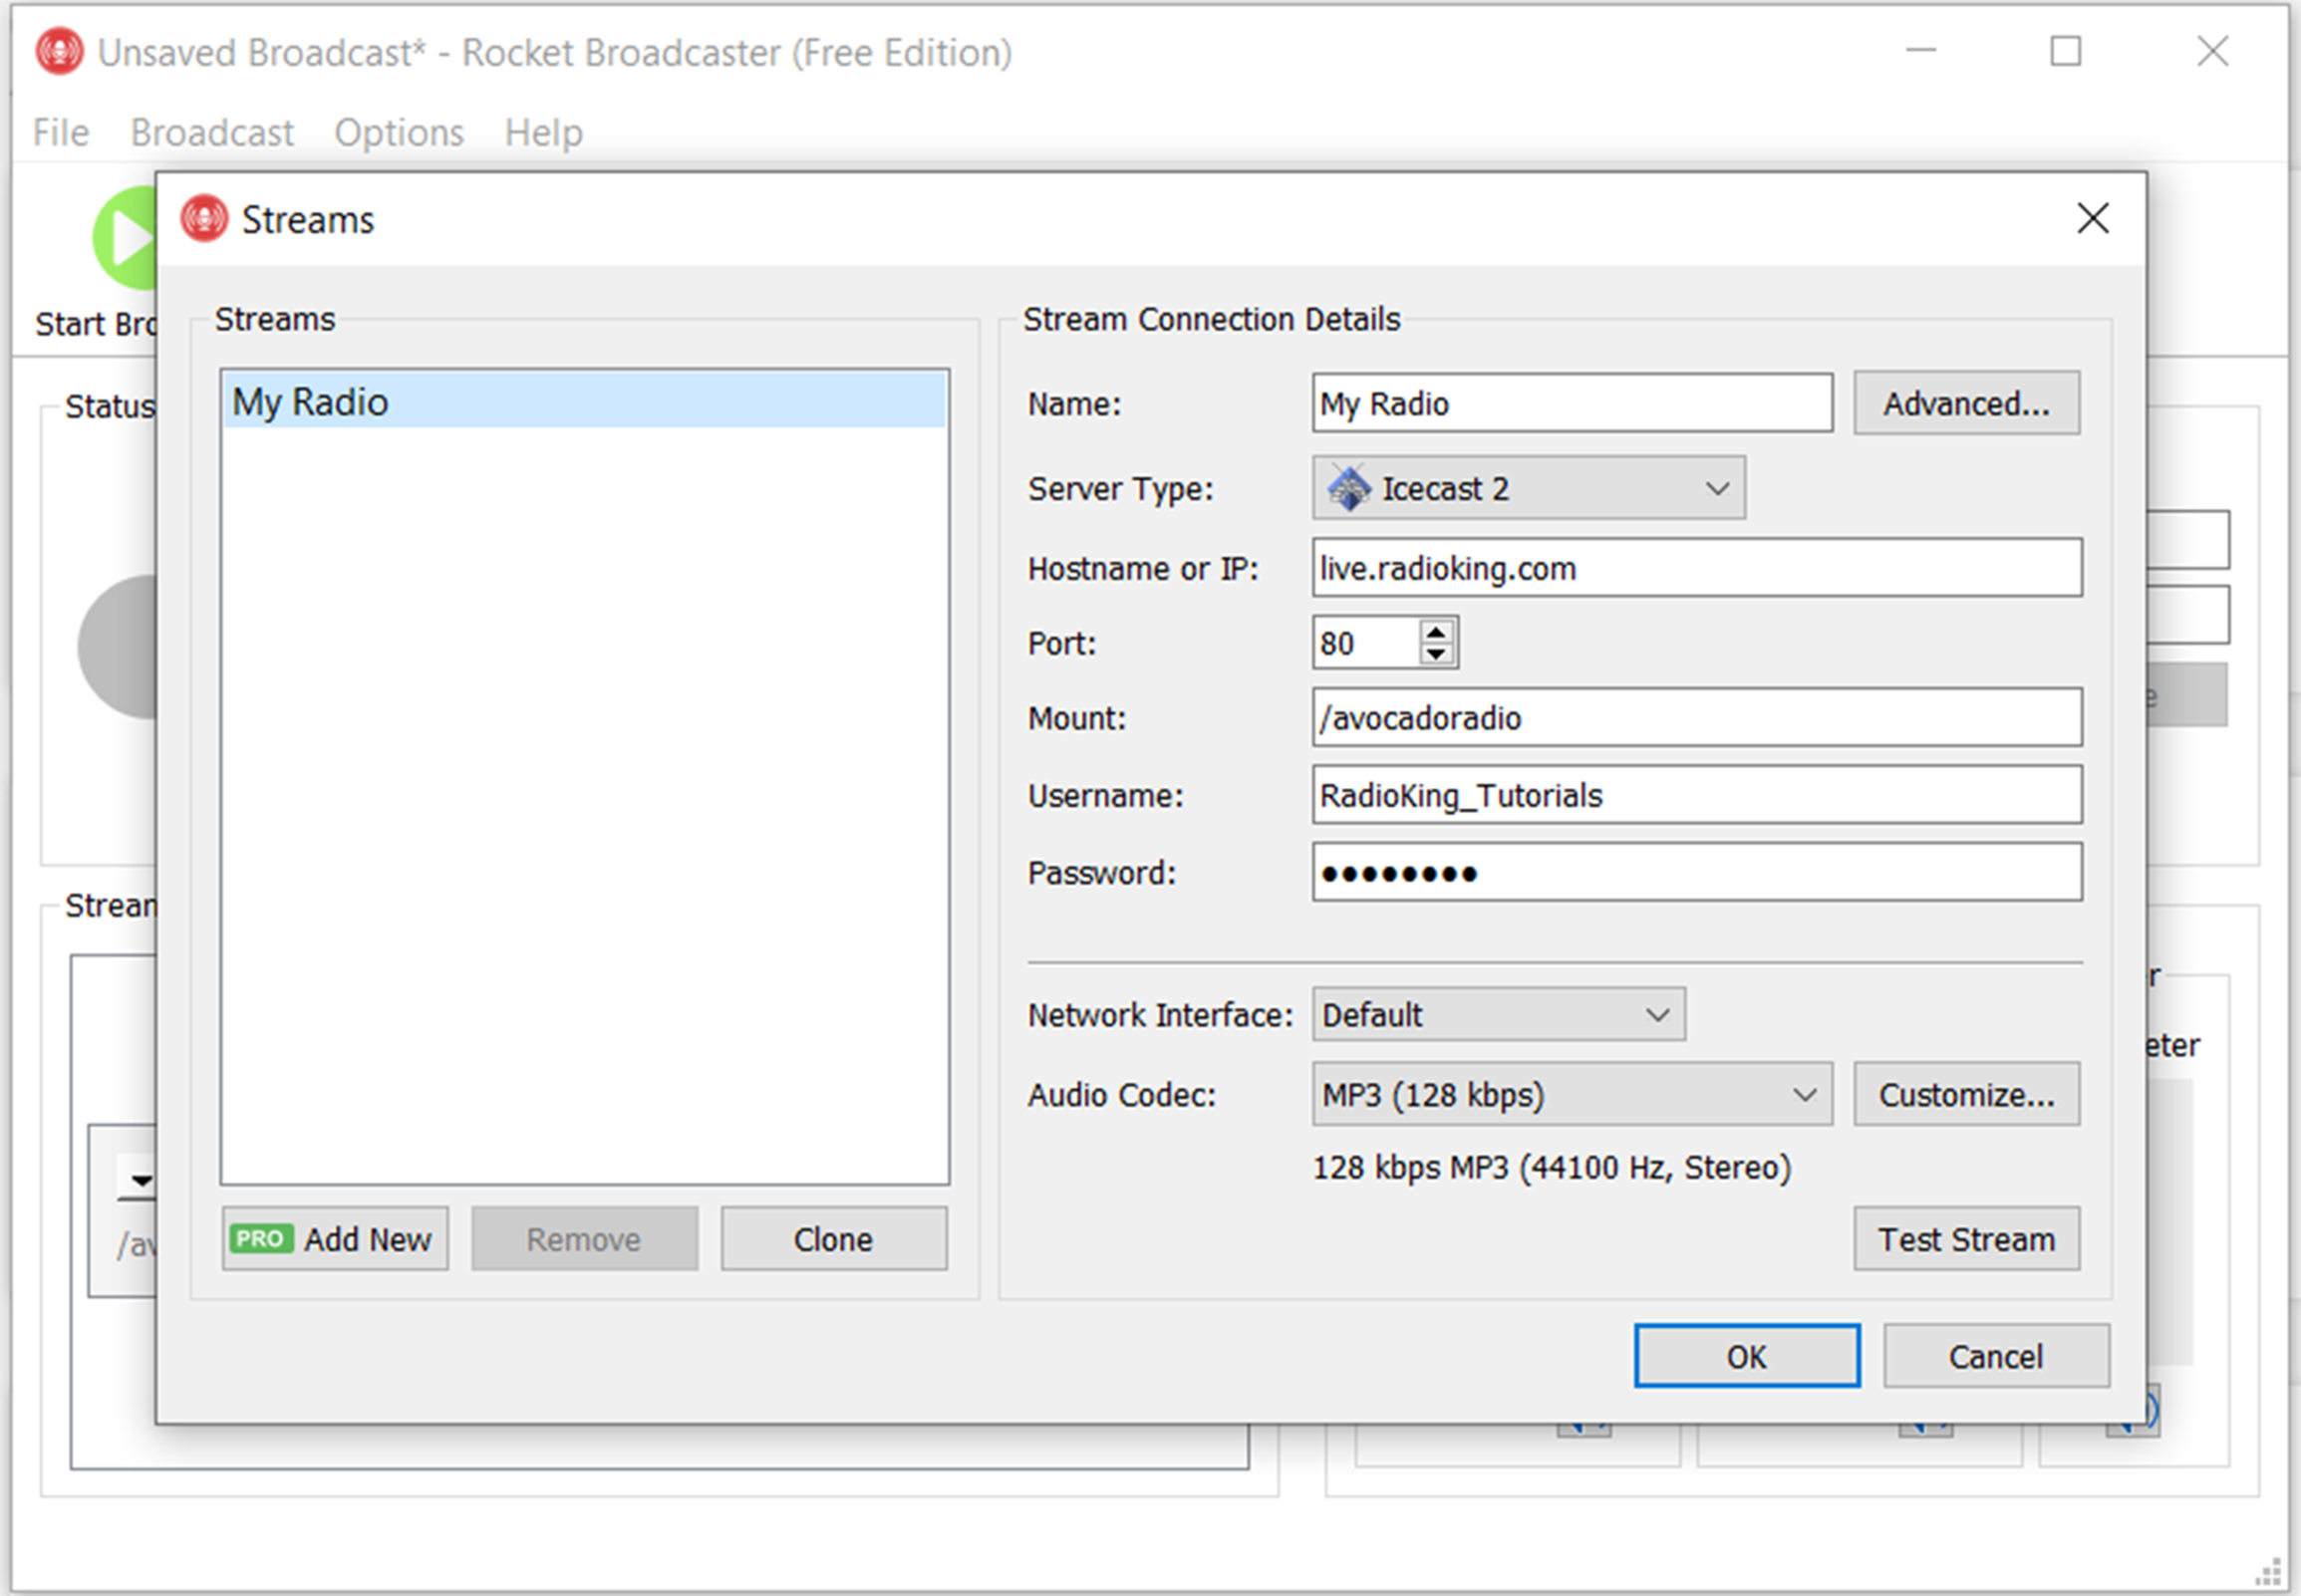
- Navigate to the ‘Broadcast’ menu in Rocket Broadcaster and select ‘Streams’.
- For the server type, choose ‘IceCast 2’, which is well-suited for robust and reliable streaming.
Entering Server Details:
- Specify the ‘Hostname or IP’ as live.radioking.com to connect to the right server.
- Input ’80’ for the Port, which is typically used for HTTP traffic, ensuring good accessibility and compatibility.
Setting Your Mountpoint:
- Assign a unique mountpoint in the ‘Mount’ field. This acts as a specific entry point on the server, distinguishing your stream from others.
Authentication and Connection
Inputting User Credentials:
- Fill in your ‘Username’ and ‘Password’ fields with your RadioKing credentials. This is essential for securing and personalizing your stream access.
Verifying Connection Settings:
- Click the ‘Test Stream’ button to confirm that all settings are correct and that you can establish a stable connection to the server.
Saving Settings:
- After testing, click ‘OK’ to save your configurations. This ensures that your setup is preserved and ready each time you start broadcasting.
By following these steps, you will have your stream finely tuned and authenticated, ready to broadcast smoothly to your listeners. Proper server setup and secure authentication are key to maintaining a reliable connection, which in turn enhances the quality of your broadcasts and ensures a great listener experience.
Note: you’ll find all of your connection information under the Live Tab of your Radio Manager.
4/ Integrating Additional Streaming Software
Rocket Broadcaster offers seamless compatibility with a variety of DJ and music management programs. This flexibility allows you to enhance your live shows with dynamic playlists and sophisticated sound effects. Here’s how you can integrate these tools to elevate your radio shows:
Managing Metadata for Live Shows
Metadata plays a crucial role in delivering a polished and professional listening experience. Here’s how to configure these settings within Rocket Broadcaster:
Accessing Metadata Settings:
- Go to the ‘Broadcast’ menu and select ‘Metadata Capture’. This section allows you to specify how song titles and artist information are displayed to your listeners.
Configuring Metadata Sources:
- If you use external music software like Mixxx, Virtual DJ, or Serato DJ, ensure that the application is set to catch metadata from these programs. This integration automatically updates what your audience sees as tracks change.
Manual Metadata Entry:
- For those instances where automatic screen isn’t available, you can manually input metadata directly on the main panel of this app. This is especially useful during live interviews or when playing unreleased tracks.
Testing Metadata Display:
- Run a quick test stream to ensure that all metadata appears correctly on listener devices. It’s important that this information is accurate and updates fluidly as the show progresses.
By integrating your favorite DJ software with Rocket Broadcaster, you not only streamline the management of your music but also ensure that your listeners are always informed about the tracks they are enjoying. Proper metadata management enhances the professionalism of your streams and can significantly increase listener engagement and satisfaction.
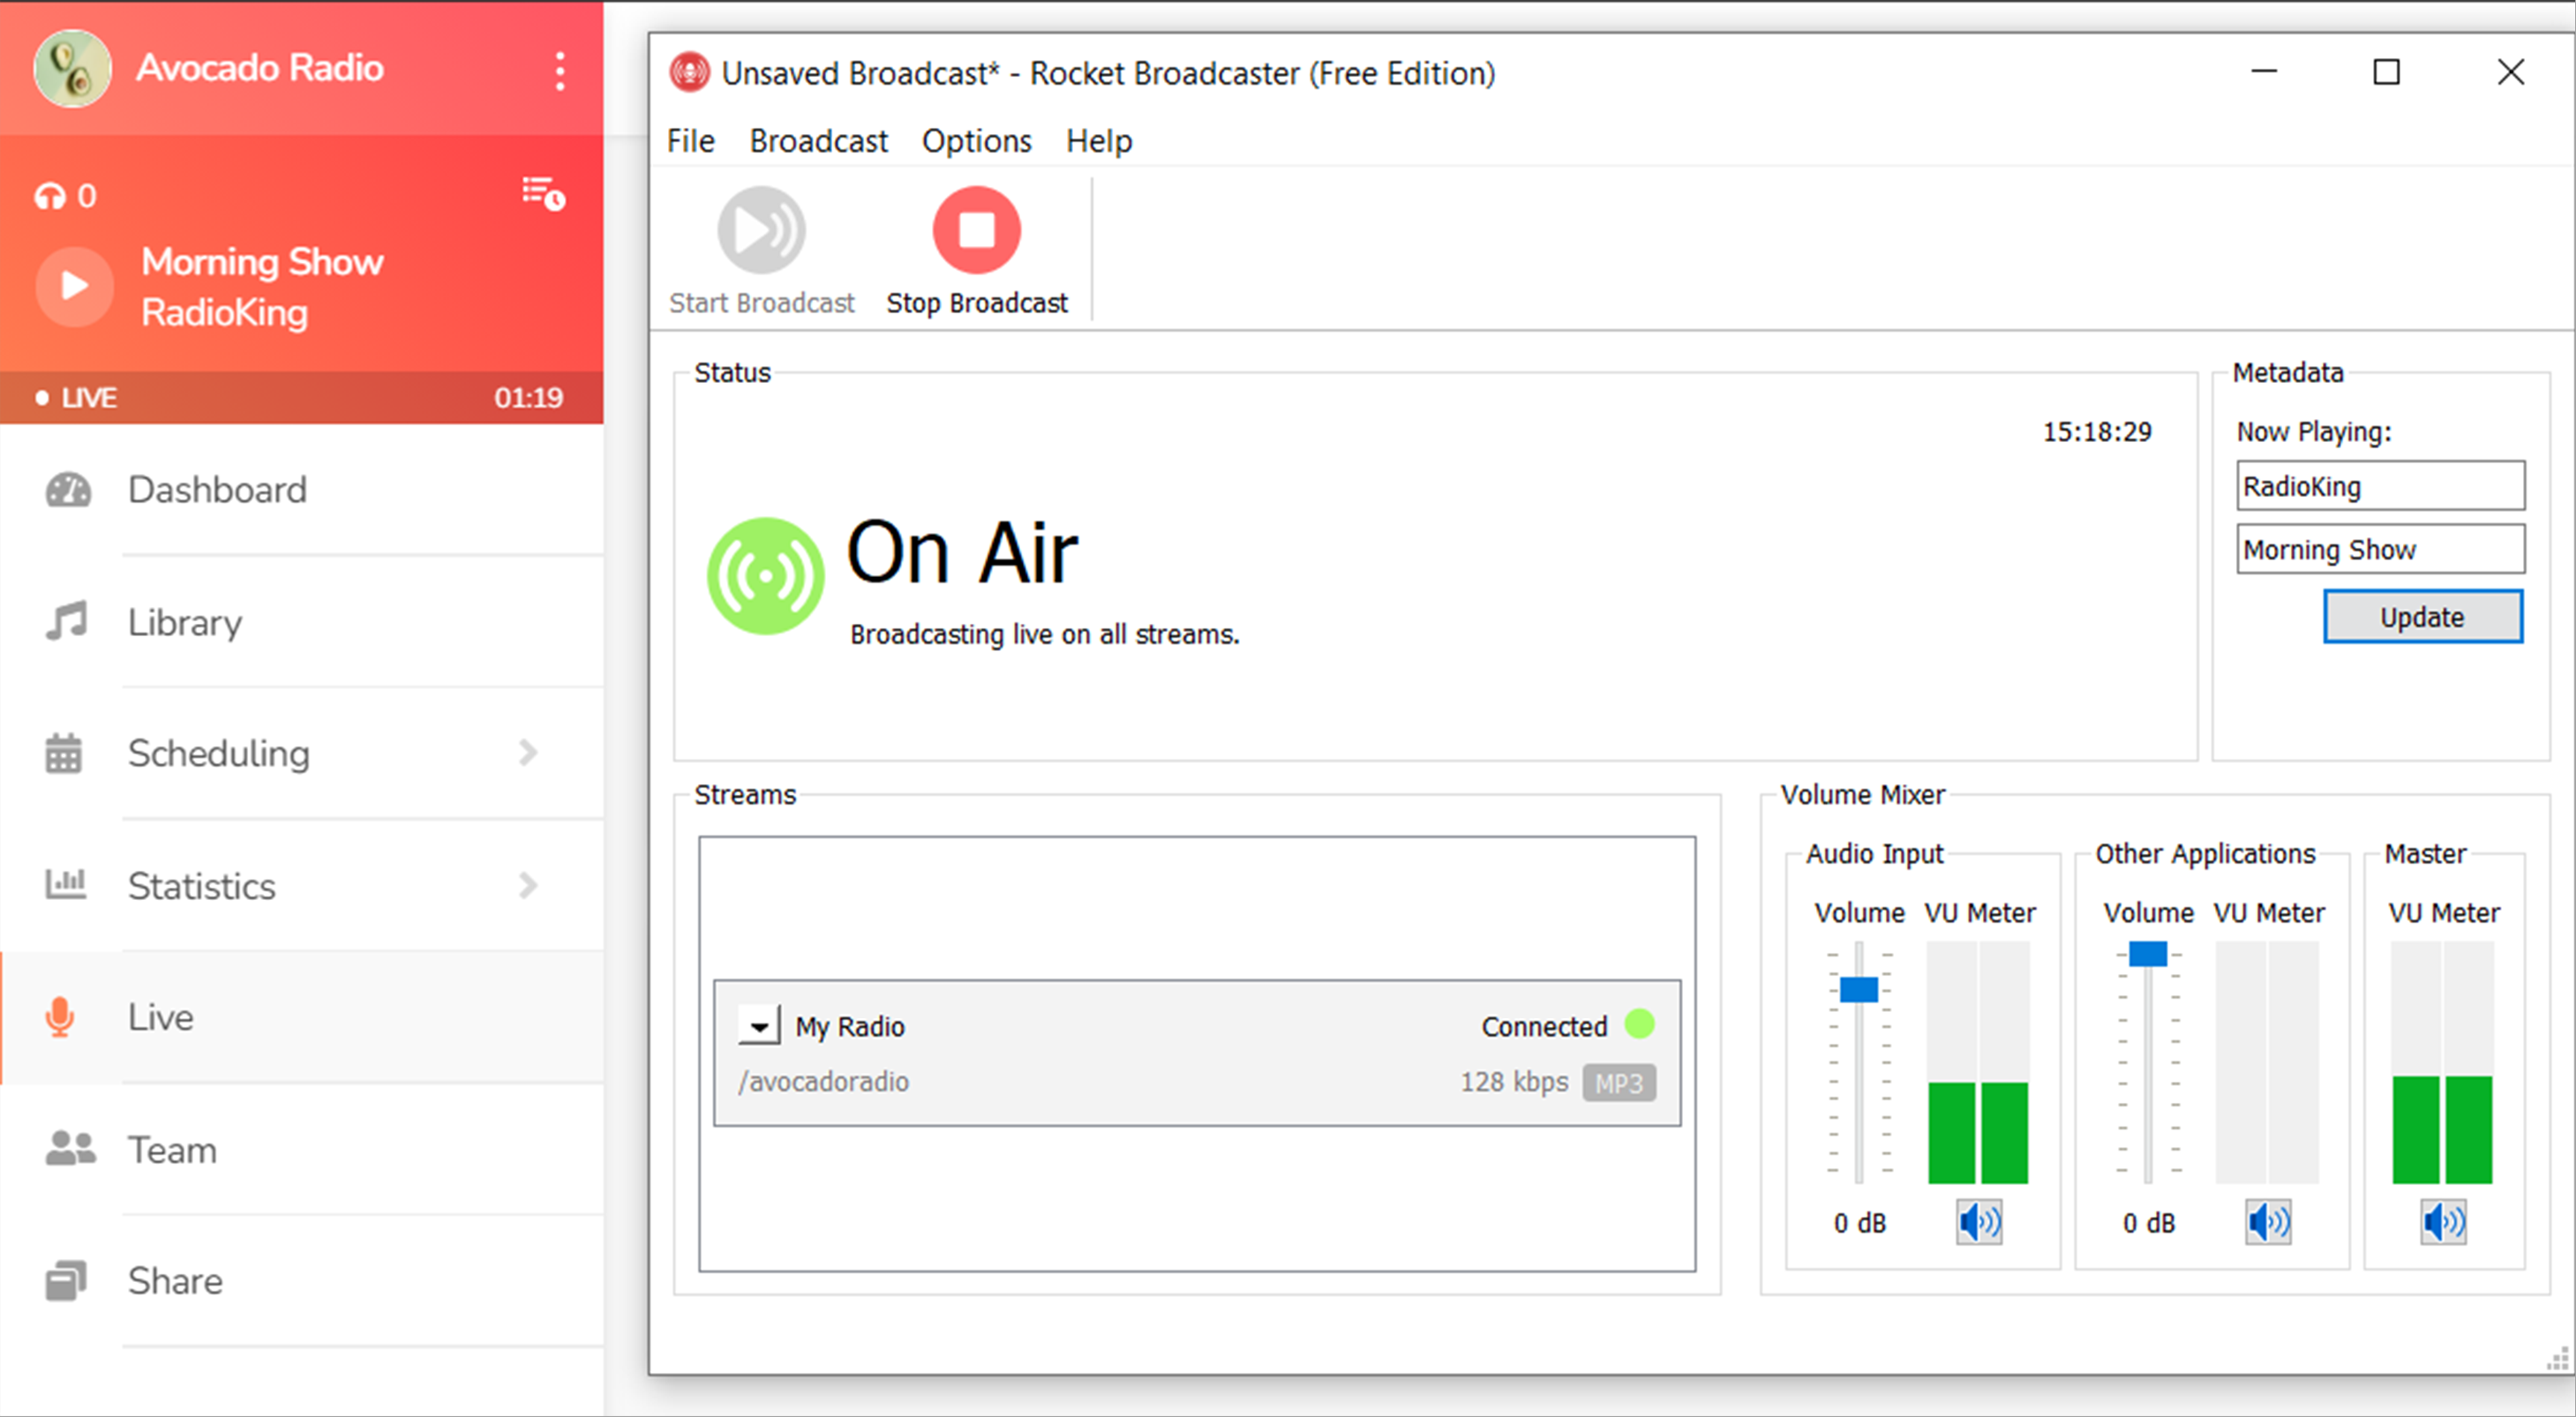
5/ Going Live and Monitoring Your Stream
Once your setup is complete, initiating your live stream is the final step towards connecting with your audience. Here’s how to ensure that your stream runs smoothly from start to finish:
Starting Your Stream
Launching the Stream:
- Simply click the ‘Start Broadcast’ button in Rocket Broadcaster. This action activates your stream and begins transmitting your content to your listeners.
Monitoring Stream Health:
Keep an eye on the streaming indicators within Rocket Broadcaster. Green signals indicate a healthy transmission, while red may suggest issues needing immediate attention.
Troubleshooting Common Issues:
- If you encounter any disruptions, check your network connection and the settings you’ve configured for compatibility and stability. Quick adjustments can often resolve minor issues without interrupting the flow of your show.
Concluding Your Session
Ending your session correctly is as important as starting it. Proper shutdown procedures ensure your content ends smoothly and your equipment remains set up for future use.
Stopping the Stream:
- When you’re ready to end your show, click the ‘Stop Broadcast’ button. This will properly close the transmission channel and signal to your listeners that the show has concluded.
Disconnecting from the Platform:
- After stopping the stream, ensure that you disconnect from the platform by logging out or closing the software. This prevents any unauthorized use of your channel and helps maintain security.
Reviewing Broadcast Performance:
- Lastly, review the performance of your broadcast through this app’s history or logs. This can provide insights into listener numbers, peak times, and potential technical improvements for future streams.
By following these steps, you can ensure that each live session is conducted professionally, maintaining high standards of quality and engagement. These practices not only enhance the listener experience but also bolster your reputation as a reliable content creator.
If you want more informations about creating your home radio studio, you can go further with this article.