
When it comes to recording radio broadcasts or podcasts, selecting the right audio recording application is essential. The software you choose will significantly impact the quality and efficiency of your recordings. Good audio software ensures that your radio shows sound professional, helps you edit with ease, and allows you to add effects and jingles seamlessly.
High-quality software can make the recording process smoother and more enjoyable. On the other hand, using the wrong application might lead to frustration and poor audio quality. Therefore, taking the time to choose the best tool for your needs is crucial for creating top-notch radio shows.
In this article, we’ve tested and reviewed five different audio recording software to help you create your radio shows quickly and easily. Let’s dive into the details of each one.
1/ Mastering Your Recordings with Audacity
2/ Harnessing the Power of GarageBand for Radio Shows
3/ Professional-Grade Audio with Adobe Audition
4/ Unleashing Creativity with Reaper’s Customization
5/ Effortless Recording with Smartphone Dictaphones
1/ Mastering Your Recordings with Audacity
Why We Recommend Audacity
Audacity is a versatile and powerful audio recording app that we highly recommend. It’s perfect for creating jingles, editing your shows, or simply recording your broadcasts. Audacity offers a wide range of features that cater to both beginners and advanced users. Despite its professional capabilities, Audacity is completely free, making it accessible to everyone.
One of the standout features of Audacity is its extensive library of tutorials. These resources make it easier to learn and master the program, even if you’re starting from scratch. Whether you’re adding effects, cutting and splicing audio, or managing multiple tracks, Audacity provides the tools you need to create high-quality radio shows.
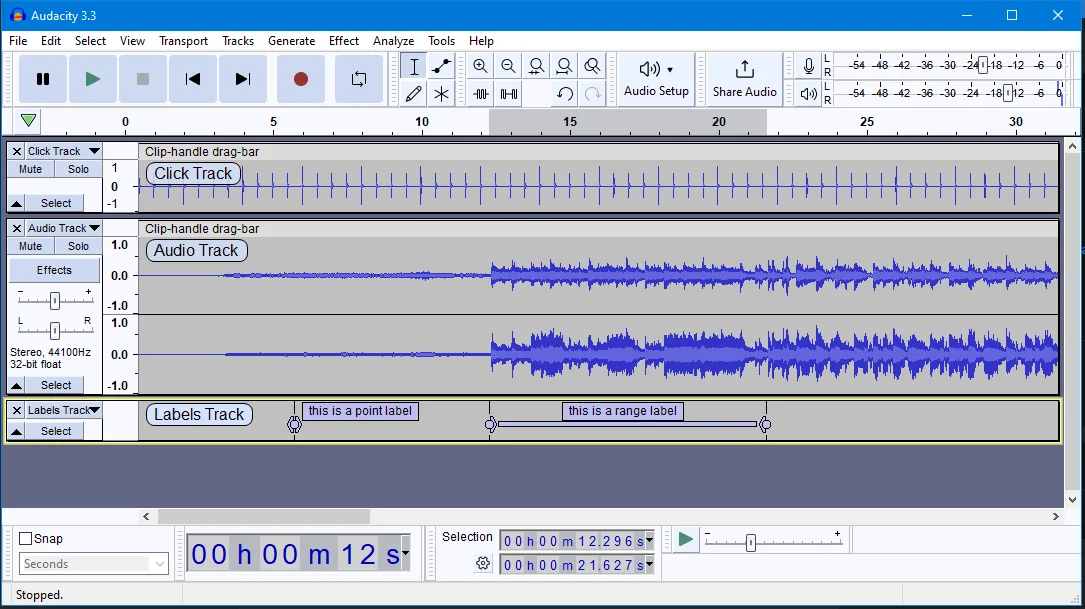
Getting Started with Audacity
Getting started with Audacity may seem intimidating at first, but there’s no need to panic. Here’s a simple guide to help you begin:
- Download and Install: Go to the Audacity website and download the latest version. Follow the installation instructions.
- Set Up Your Microphone: Ensure your microphone is connected and configured properly in Audacity’s settings.
- Record Your Audio: Click the red record button to start recording your show. Speak clearly into the microphone.
- Edit Your Recording: Use the various editing tools to cut, splice, and enhance your audio. You can add effects like reverb or equalization to improve sound quality.
- Save and Export: Once you’re satisfied with your recording, save your project and export it in your desired format (e.g., MP3, WAV).
Remember, numerous tutorials are available on RadioKing to help you understand and use all the features Audacity offers. With a bit of practice, you’ll find that Audacity is an incredibly powerful tool for all your audio recording needs.
Record your show with Audacity
2/ Harnessing the Power of GarageBand for Radio Shows
Versatility for Apple Users
GarageBand is a widely popular audio recording software among Apple users. Originally designed for musicians, it has proven to be highly versatile and effective for recording radio shows as well. One of the biggest advantages of GarageBand is its user-friendly interface, making it accessible even to those with limited technical knowledge.
GarageBand comes pre-installed on all Mac computers and is available for free, which is a significant plus. This app offers a wide range of features, including a variety of pre-recorded loops, multiple tracks, and an array of effects that can enhance your recordings. The intuitive drag-and-drop functionality allows users to easily add and edit audio clips, making it an excellent choice for radio show hosts.
Using GarageBand for Radio Shows
GarageBand’s intuitive design simplifies the process of recording and editing your radio shows. Here’s a step-by-step guide to help you get started:
- Open GarageBand and Create a New Project: When you open GarageBand, select “Empty Project” and then choose “Voice” as your track type. This setup is ideal for recording spoken audio.
- Set Up Your Microphone: Connect your microphone to your Mac and ensure it’s properly configured. You can adjust the input settings within GarageBand to ensure optimal sound quality.
- Record Your Show: Click the red record button to start recording. Speak clearly into your microphone, and keep an eye on the levels to ensure your voice isn’t too loud or too soft. You can pause and resume recording as needed.
- Add Effects and Jingles: GarageBand allows you to easily add effects to your voice. For instance, you can enhance your vocals with reverb or EQ settings. Additionally, you can drag and drop jingles, sound effects, or background music into your project. This feature is particularly useful for creating a professional-sounding radio show.
- Edit Your Recording: After recording, you can edit your audio by cutting out unwanted parts, adjusting volumes, and adding transitions. GarageBand’s visual interface makes it easy to see and manipulate your audio clips.
- Use the Notepad Feature: One of GarageBand’s unique features is the built-in notepad, which allows you to jot down notes and organize your show’s content. This can serve as a helpful guide while recording and editing your show.
- Save and Export Your Project: Once you’re satisfied with your recording, save your project. You can then export your show in various formats, such as MP3 or AAC, ready for broadcasting.
3/ Professional-Grade Audio with Adobe Audition
Seamless Integration with Adobe Tools
Adobe Audition is a top-tier audio recording and editing software that integrates seamlessly with other Adobe Creative Cloud tools. If you’re already familiar with Adobe products like Photoshop or Premiere Pro, you’ll find Audition’s interface intuitive and easy to navigate. This application is designed for professionals and offers a comprehensive suite of tools for recording, editing, mixing, and mastering audio.
One of the standout features of Adobe Audition is its multi-track editor, which allows you to record multiple audio sources simultaneously. This is particularly useful for radio shows that involve multiple hosts or guests. Additionally, Audition provides advanced audio restoration capabilities, enabling you to clean up recordings and remove unwanted noise effortlessly.
The integration with other Adobe tools means you can easily import and export audio projects between different Adobe applications. For example, you can enhance your radio show with graphics created in Photoshop or videos edited in Premiere Pro. This interconnected workflow can significantly boost your productivity and the overall quality of your radio shows.
Subscription Details and Costs
While Adobe Audition offers a powerful set of features, it does come with a cost. Adobe operates on a subscription model, which may be a consideration for budget-conscious users. The pricing for Adobe Audition is as follows:
- Monthly Subscription: $20.99 per month
- Annual Subscription (Paid Monthly): $20.99 per month
- Annual Subscription (Prepaid): $239.88 per year
For users who require access to multiple Adobe Creative Cloud applications, Adobe offers bundled plans that include Audition along with other tools like Photoshop, Illustrator, and Premiere Pro. These plans can be more cost-effective for users who need a comprehensive suite of creative tools.
Despite the cost, many professionals find Adobe Audition’s features and seamless integration with other Adobe products well worth the investment. It provides a level of control and precision that is unmatched by many other audio recording application options, making it a valuable tool for producing high-quality internet radio shows.
4/ Unleashing Creativity with Reaper’s Customization
Customization and Popularity Among Podcasters
Reaper is renowned for its extensive customization options, making it a favorite among podcasters and audio professionals. This application offers a highly flexible and configurable environment that allows users to tailor their workflow to their specific needs. With Reaper, you can customize everything from the layout and appearance of the interface to the functionality of various tools and shortcuts.
One of the reasons Reaper is so popular is its affordability. Unlike many other professional audio recording program options, Reaper offers a very generous evaluation period and a low-cost license fee. Despite its low price, Reaper doesn’t skimp on features. It supports a vast range of audio formats and offers robust editing capabilities, including multi-track recording, MIDI support, and an array of built-in effects and plugins.
Podcasters appreciate Reaper’s reliability and efficiency. The software is lightweight and runs smoothly on most systems, ensuring that you can focus on your recording without worrying about technical glitches or crashes. Its powerful scripting capabilities also allow for further automation and enhancement of your production process, making Reaper a versatile tool for creating high-quality internet radio shows.
Challenges and Benefits of Using Reaper
While Reaper is highly customizable and powerful, it does come with a learning curve. Here are some of the challenges and benefits of using Reaper:
Challenges:
- Initial Complexity: Reaper can be daunting for beginners due to its extensive customization options and myriad features. New users might find the interface overwhelming at first.
- Learning Curve: Mastering Reaper requires time and effort. While there are many tutorials and community resources available, users need to invest time to fully understand and utilize the program’s capabilities.
- Limited Customer Support: Unlike some other professional program, Reaper does not offer extensive customer support. Users often rely on forums and community support for troubleshooting and learning.
Benefits:
- Extensive Customization: Reaper’s customization options are unparalleled. You can adapt the application to suit your workflow perfectly, enhancing productivity and efficiency.
- Affordable Pricing: Reaper offers a highly competitive pricing model. The application provides a full-featured, 60-day free trial, after which users can purchase a license at a reasonable cost.
- Robust Features: Despite its affordability, Reaper offers a comprehensive set of features suitable for professional audio recording and editing. This includes multi-track recording, extensive plugin support, and advanced editing tools.
- Lightweight Performance: Reaper is known for its efficient performance. It runs smoothly on most systems, making it a reliable choice for recording and editing without the fear of program crashes.
Overall, Reaper is a powerful tool for those willing to invest the time to learn its intricacies. Its combination of affordability, customization, and robust features makes it an excellent choice for podcasters and radio show producers looking for a high-quality audio recording solution.
Download Reaper
5/ Effortless Recording with Smartphone Dictaphones
Convenience of Smartphone Dictaphones
In today’s digital age, smartphones come equipped with powerful features, including high-quality dictaphones. These built-in recording apps are incredibly convenient for recording internet radio shows, especially when you’re on the go or need a quick and easy solution. The primary advantage of using a smartphone dictaphone is its portability and accessibility. You can start recording with just a few taps on your phone, making it an excellent option for spontaneous interviews or outdoor broadcasts.
Smartphone dictaphones are also straightforward to use, with intuitive interfaces that require minimal setup. Most smartphones come with basic editing tools, allowing you to trim or adjust your recordings before sharing or transferring them to your computer for further editing. Additionally, smartphones typically have good microphones, and you can further enhance the audio quality by using external microphones or hands-free kits.
Recommended Apps for iOS and Android
While the built-in dictaphone apps on smartphones are handy, several dedicated apps can offer enhanced features and better control over your recordings. Here are some top recommendations for both iOS and Android users:
For iOS:
- Voice Memos: This is the default recording app on iPhones. It’s simple, easy to use, and perfect for quick recordings. You can easily edit, trim, and share your recordings directly from the app.
- Ferrite Recording Studio: Ferrite offers powerful editing tools and is ideal for longer recordings. It includes features like noise reduction, multi-track recording, and customizable templates, making it a robust option for internet radio shows.
For Android:
- Voice Recorder: This app is straightforward and effective, allowing users to record high-quality audio effortlessly. It supports various file formats and offers basic editing tools like trimming and adjusting volume.
- Easy Voice Recorder: As the name suggests, this app is designed for simplicity and ease of use. It supports high-quality PCM and AAC recording, and you can easily share your recordings via email or social media.
Using these apps can significantly enhance the quality of your recordings, making your internet radio shows sound professional even when recorded on a smartphone. They offer additional features and better audio control compared to the basic dictaphone apps, providing you with more flexibility and convenience.
In conclusion, smartphone recorders are an excellent option for those looking for a quick and portable solution for recording internet radio shows. With the right apps, you can achieve high-quality recordings that meet your professional standards, all from the convenience of your mobile device.
What about you? Which tool do you use to record your programs?

