Is your home studio set up and ready to go? Perfect, because we’re here to show you how to broadcast live from your new studio!
This tutorial follows our previous articles on creating and assembling your first radio studio.
Part I: How to create your Home Radio Studio
Part II: How to assemble your Home Radio Studio
Why broadcast live on your radio station?
Live broadcasts are a huge part of the radio world, but why? There are multiple reasons why going live on your radio station is a great idea:
- Audience interaction: allow your audience to participate in your live radio shows. Whether you take live calls from your listeners, broadcast audio shout-outs, or read messages sent in via social media, make your listeners feel like they are a part of your radio.
- Authentic content: broadcasting live allows for raw, authentic content with no post-production. What you hear is what you get! It’s a great way to let your personality shine through.
- A shared moment: there’s something special about living the same moment in real-time along with hundreds or thousands of other people across the globe. Although you may all be in different places, you’re all connected through this unique listening moment.
Choosing a live broadcasting software
Before you start broadcasting from your Radio Studio, you’ll need to decide which live broadcasting software you want to use. This is what will allow you to go live on air on your radio station, however bear in mind that not all software offers the same features.
Note: RadioKing is compatible with any broadcasting software that runs on IceCast 2.
If you’re looking for simplicity, we invite you to test the following solutions:
Configure your home studio to broadcast live
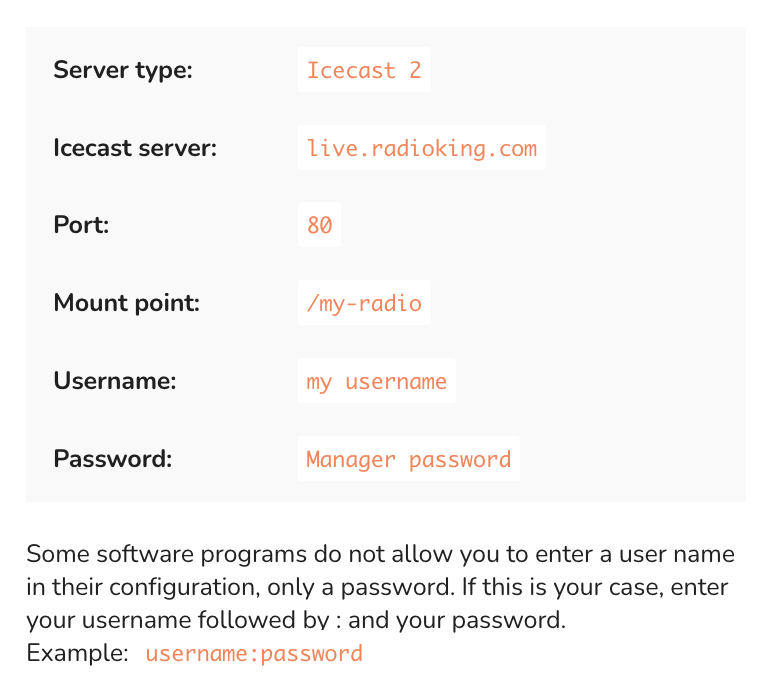
Have you chosen your live broadcasting software? Time to get back to your home studio! Once your connections are made, your broadcasting software is ready to go. In order to configure it, you’ll need to use the live connection information in your Radio Manager.
It’s important to do one final check: after plugging your mixer into your computer via USB, you’ll need to verify that it’s recognised by your broadcasting software. If you’re using a USB microphone, you won’t need to worry about this step.
We hope that you found this article helpful and that you have everything you need to host a successful live broadcast!