
Mixxx is a software that will allow you to broadcast live on Windows, Mac or Linux.
In addition to being free, the software also allows you to customise the interface. Do you want to broadcast live on your online radio station with Mixxx? Here’s our guide!
Download and Install Mixxx
Mixxx is compatible with Windows, Mac and Linux. Go to the Mixxx site to download the software that is compatible with your operating system.
Download Mixxx
Warning: you must also install Lame, a small plugin allowing you to broadcast your titles in MP3.
Download LAME for Windows Download LAME for MacTo install Lame, simply double-click on the downloaded file.
You're on Windows and have already installed AirKing?
To make sure that Mixx works properly, please follow these steps:
– Uninstall AirKing
– Once the uninstallation is complete, simultaneously press the keys Windows and R, a small window should open
– In this window, copy this “%localappdata%” and hit the Enter button, an explorer will open
– Locate the “AirKing” and “Mixxx” folders and delete them permanently.
You're on Mac and have already installed AirKing?
To make sure that Mixx works properly, please follow these steps:
– Delete AirKing from your Applications
– Open the Application terminal
– Enter Entrez open ~/Library/Application\ Support
– Locate the “Mixxx” folder and delete it permanently.
Discover the interface
Mixx has the particularity of being an ultra customisable software. Make sure you display all the elements necessary for a live broadcast. You can view the Skin Settings by clicking on the wheel at the top right of your software.
This is what your interface should look like (without the coloured boxes of course).
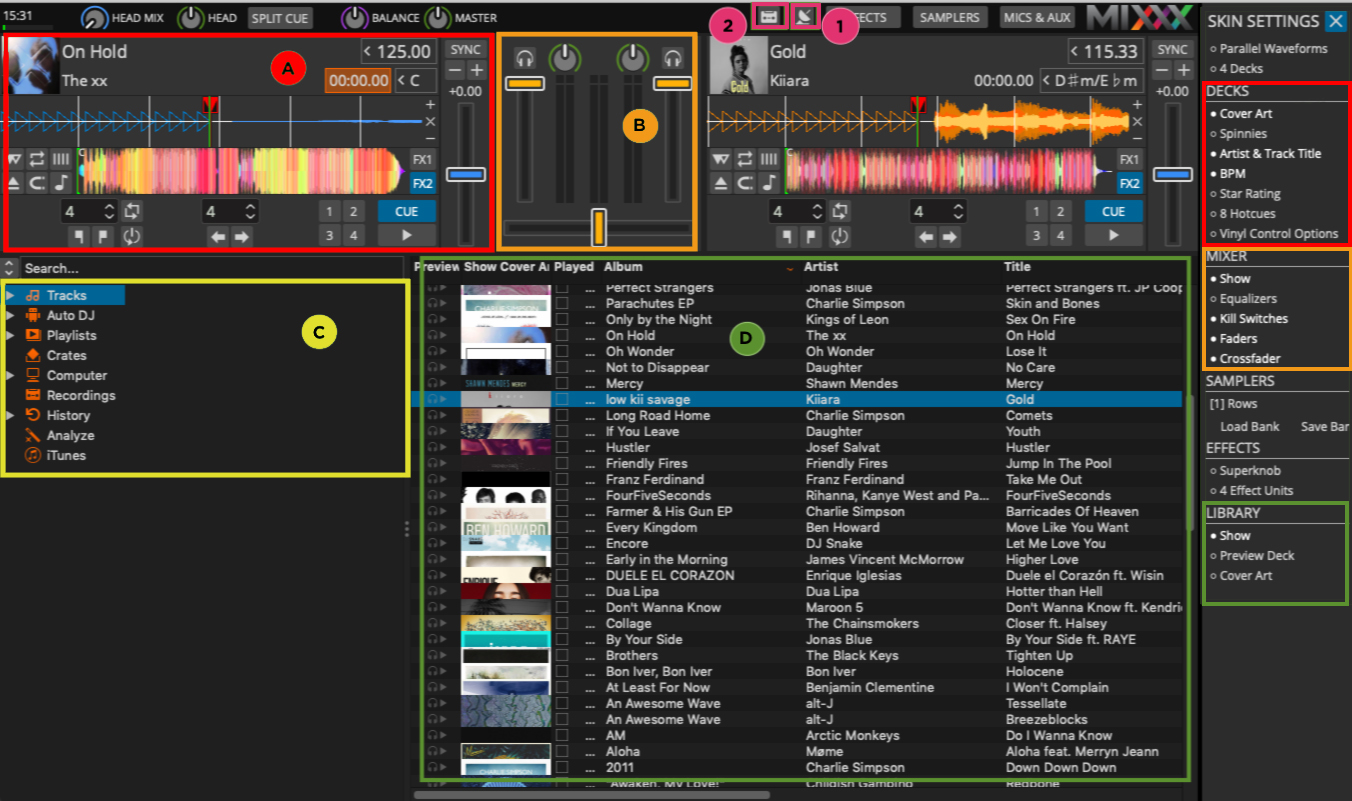
Section A corresponds to the Decks (in red), it is in this section that you will be able to modify the elements related to these two decks (album cover, artist name…)
Section B corresponds to the Mixer (in orange).
Section C (in yellow) will allow you to manage your titles and create Playlists.
Section D corresponds to your Library (in green).
Buttons 1 and 2 correspond to live broadcasting (1) and recording this broadcast (2).
You can display more items (or less) depending on your needs.
How to configure Mixxx
Is everything ready? We can now configure Mixxx by entering your login information.
Head over to Preferences > Live Broadcasting.
To set up your broadcast software, you’ll need the connection information found in your Radio Manager. (Live > Information).
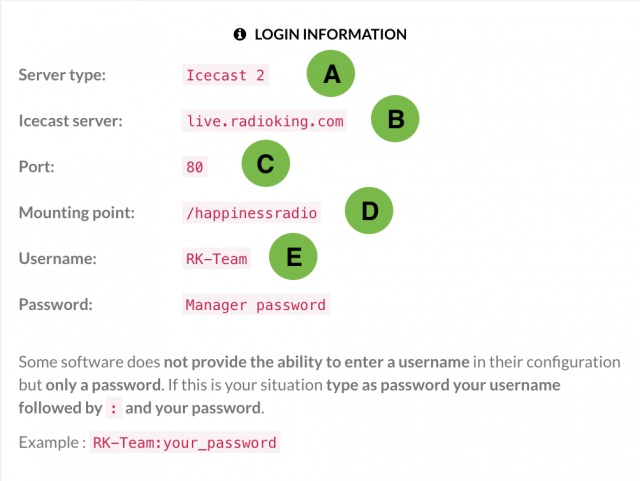
Under Type choose Icecast 2 (A)
Under Host : live.radioking.com (B)
Under Login, enter the Username which is in your login information. (E)
Under Mount, enter the mounting point (D)
Under Port enter: 80 (C)
Under Password : Enter your password for your Radio Manager.
Import your music
Mixxx will allow you to automatically import your music files. To import a folder, head over to Preferences> Library.
Here you will be asked to choose the location of your Music folder. It is important to choose this location wisely, because when you add music to your folder, the software will automatically add it to the Library.
To add a folder, click on Add and then choose the folder you’d like to import.
Broadcast music live
To play music, drag a title from the Library (D) onto a Deck (A). Click on play to launch the title and click on Enable Live Broadcasting to broadcast it live.
You can choose the titles you want to broadcast gradually and place them on the Decks. Once the title is finished, Mixxx automatically switches to the title on the other deck.

You also have the possibility of switching to the next music yourself by moving the cross fader.
Top Tip: You can listen to the music that is playing by simply clicking on the headphone icon. Make sure you have set the audio outputs in Preferences> Sound Hardware> Output, be careful to choose your output device in the Headphones field.

If you want, you can also broadcast in Auto DJ, that is to say that the software will automatically broadcast the titles without you placing them on the decks. To do this select the titles you want to broadcast, you can select multiple titles by keeping the command key (on mac) or ctrl (on PC) pressed down. Next, make a right click then select Add to Auto DJ (you can choose if you want to add titles to beginning (top) at the end (bottom) of the list).

Speak live on air
To view the microphone settings click on MICS & AUX at the top right of the software.
To speak, simply click on TALK. If you want, you can hear your feedback by clicking on the headphone icon.
To configure your microphone, head over to Preference > Sound Hardware.

Click on Input then under Microphone 1 select the microphone that you’ll be using. (Built-in Microphone if you’re using the microphone on your laptop).
You now have all the keys in hand to get started with Mixxx. You can also discover Mixxx with our video tutorial:
